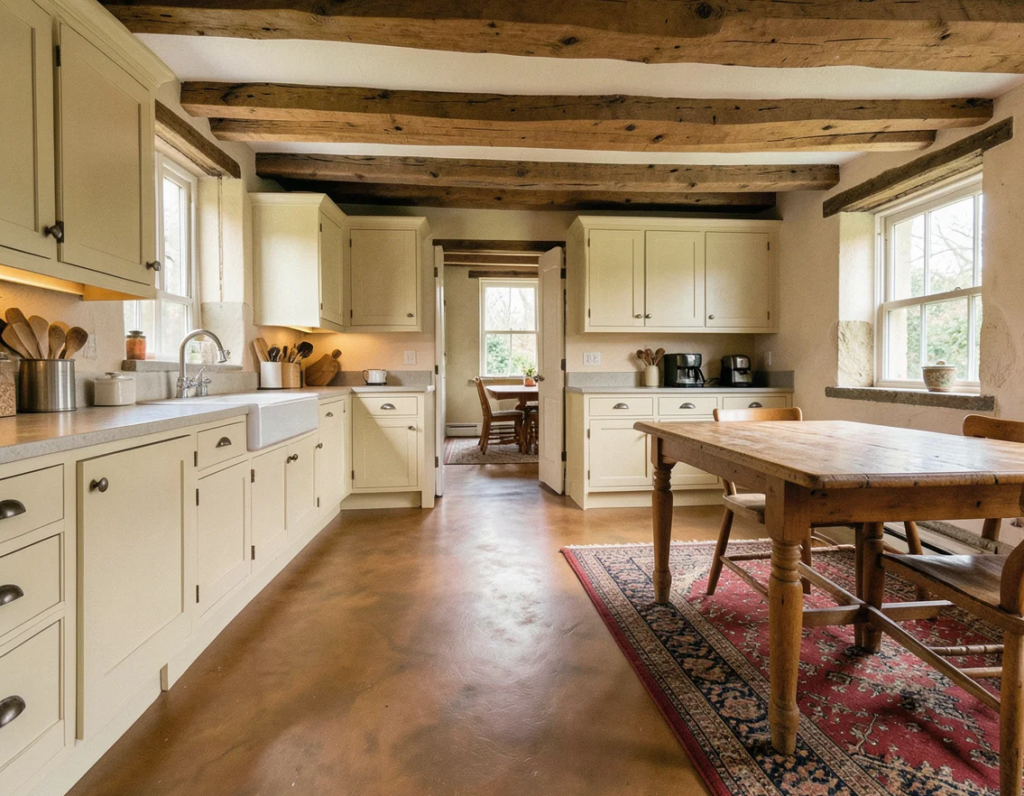

There’s a particular quality to a well-worn farmhouse floor — the sense that it has absorbed decades of use, that the colour comes from somewhere real rather than a factory. Farmhouse stained concrete floors tap directly into that quality, and they do it with a surface that’s more durable, more practical, and considerably cheaper than the reclaimed timber or aged stone they often evoke. When acid stain reacts with the minerals in a concrete slab, the colour it produces isn’t painted on — it’s part of the concrete itself. The subtle mottling, the variation from light to dark across the same floor, the way the colour shifts under different light: none of that can be replicated by any applied coating, which is precisely why it works so well in a farmhouse context.
Farmhouse Stained Concrete Floors: Design Ideas, Stain Types, and How to Get the Look Right
This guide covers the design thinking behind farmhouse stained concrete, the stain types available, how the application process works, what the floors are like to live with, and an honest account of the costs involved.
Why Stained Concrete Works in a Farmhouse Setting
Farmhouse design — whether genuinely rural or the urban interpretation of it — is built on a few consistent principles: honest materials, a preference for the handmade and imperfect, warmth without pretension, and a sense that the space has been lived in rather than staged. Concrete, in its raw state, is an industrial material. But stained and sealed, it becomes something considerably more nuanced — particularly when the stain chosen emphasises the natural rather than the uniform.
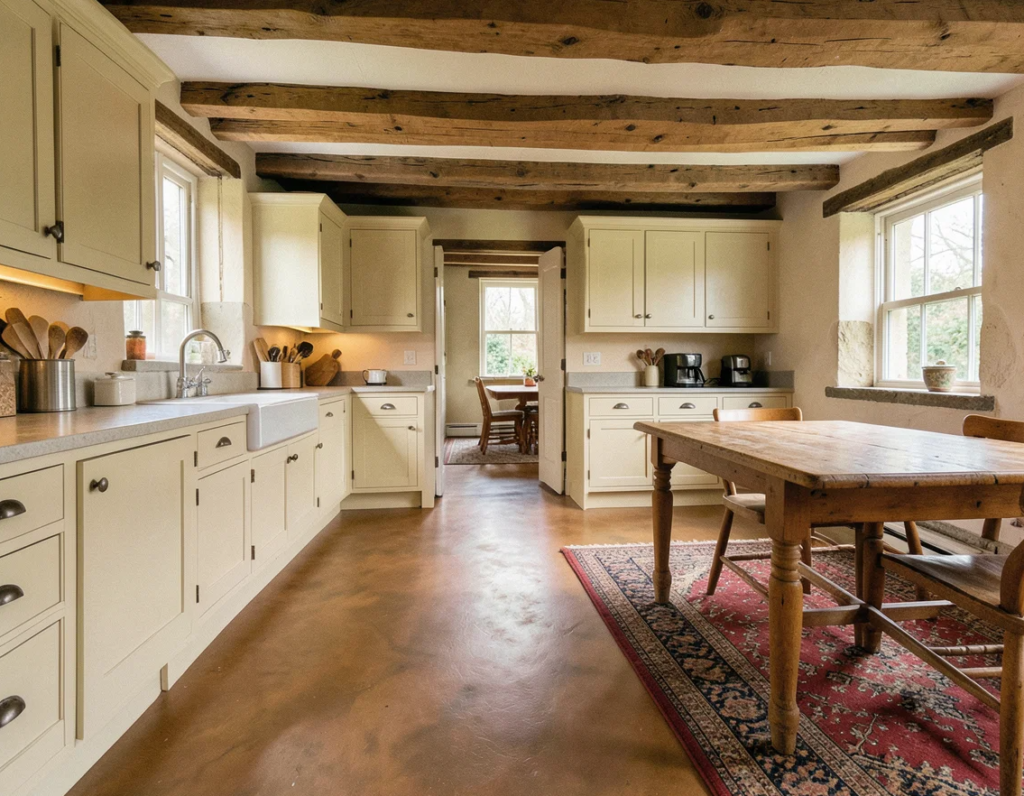
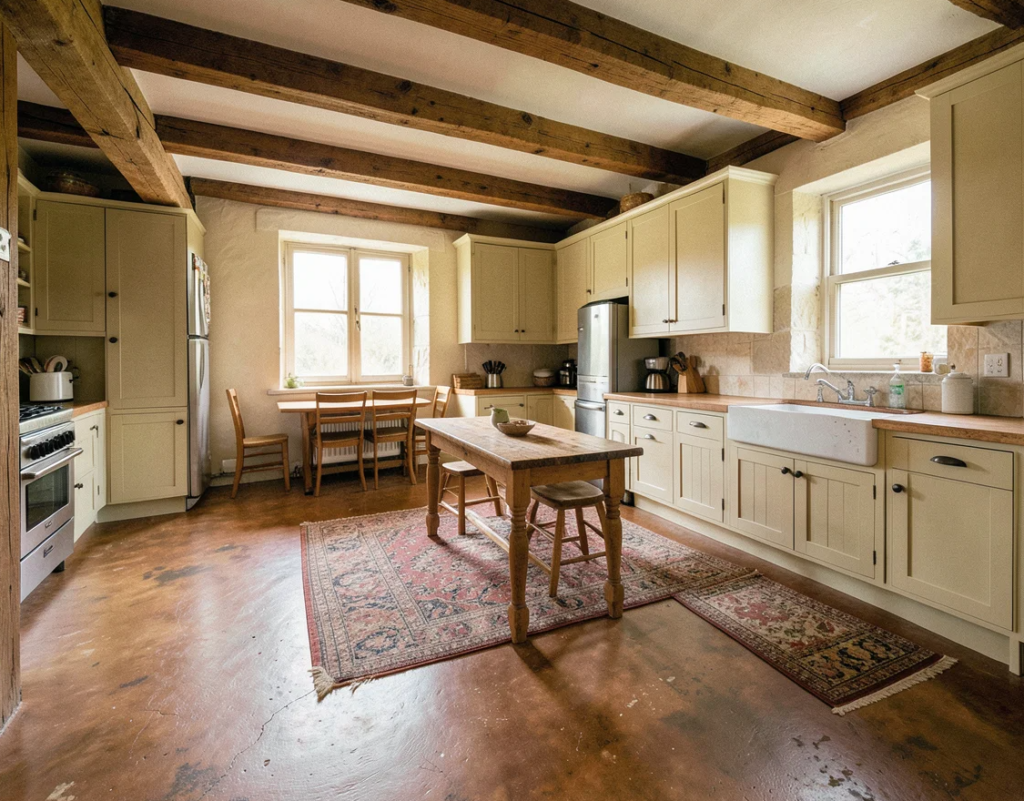
Acid-stained concrete in earthy tones — the warm browns, amber, terracotta, and sage greens that the chemistry produces naturally — sits with a farmhouse interior the way fired clay tiles or worn flagstone does. The material has weight, depth, and variation. It reads as grounded rather than slick. Pair it with exposed timber beams, cream-painted shaker cabinetry, a Belfast sink, aged brass hardware, and a couple of worn Persian rugs, and the floor looks like it belongs rather than having been installed last month.
The other reason stained concrete suits a farmhouse brief is its practicality. A floor that copes with muddy boots, dog paws, spilled cooking, and general rural or semi-rural use without showing obvious wear or demanding constant attention is a floor worth having. Stained and properly sealed concrete provides exactly that.
The Two Stain Types: Acid vs. Water-Based
The choice between acid-based and water-based stain is the most consequential design decision in any stained concrete floor project, and in a farmhouse context it shapes the character of the result fundamentally.
Acid Stain (Reactive Stain)
Acid stain is composed of water, hydrochloric acid, and metallic salts — typically iron, copper, manganese, or cobalt compounds. Applied to the concrete surface, the acid opens the pores and the metallic salts react chemically with the calcium compounds (calcium hydroxide) in the cured concrete. This is a permanent chemical change, not a coating — the colour becomes part of the concrete matrix and cannot be stripped away.
The results are characteristically organic. The reaction varies across the floor depending on the local mineral content, the concrete mix, the age of the slab, the curing conditions, and how the stain was applied. No two acid-stained floors look identical, and no acid-stained floor looks perfectly uniform. The mottling, marbling, and colour variation are features, not flaws. Acid stains create natural tones that feel one of a kind.
The colour palette available from acid staining is the one that suits farmhouse design most naturally: earthy browns (coffee, tobacco, mahogany), warm ambers and golds (desert sand, antique gold), terracotta tones, and muted greens and blues from copper-based formulations. These are the colours the chemistry produces — you can’t use acid stain to achieve pastels, brights, or precise colour matching.
The application process involves acid chemistry and requires proper safety precautions — rubber gloves, safety glasses, adequate ventilation. The reaction must be neutralised with a baking soda and water solution after the stain has worked (typically four to eight hours), then rinsed and dried before sealing. Handled correctly it’s achievable as a DIY project; handled carelessly it causes chemical burns and potentially irreversible floor damage if the neutralisation is inadequate.
Water-Based Stain (Non-Reactive Stain)
Water-based stains are polymer and pigment suspensions that penetrate the concrete surface and deposit colour without chemically reacting with it. They don’t etch or alter the concrete itself — they stain the pores in the same way fabric dye stains fibres.
The results are more predictable and more controllable than acid stain. Water-based stains offer a wider colour palette — virtually any colour is achievable — with more consistent, uniform coverage. If you want a specific warm grey, a precise dusty rose, or a consistent mid-brown that matches other elements in the room, water-based stain delivers this in a way acid stain cannot.
The trade-off is that the characteristic organic variation of acid stain — the depth, the mottling, the sense that the colour grew from within the concrete — is largely absent. Water-based stained floors can look more like painted concrete than naturally aged stone, which in a farmhouse context is either a neutral or a disadvantage depending on the level of rustic authenticity you’re after.
Water-based stains are safer to apply than acid formulations, more forgiving of application variation, and easier to clean up. They’re appropriate for decorative designs and stencilled patterns — effects where predictability of colour is essential — in a way that acid stain isn’t.
Concrete Dyes
A third option for colour effects: acetone-borne or water-based concrete dyes penetrate more deeply into the concrete than either stain type and produce vivid, saturated colours. They’re used less commonly in farmhouse applications — the colour palette tends toward brights and jewel tones — but for very specific colour requirements they offer precision that neither acid nor water-based stain can match.
The Farmhouse Colour Palette: What Works and Why
The acid stain colours that suit a farmhouse interior most naturally cluster around specific chemistry: iron and manganese compounds produce the browns and ambers; copper compounds produce greens and blues; combined formulations produce complex, layered tones.
Warm browns and ambers: The most universally farmhouse-appropriate result. Coffee brown, desert amber, malayan buff, and similar warm tones ground a space in the way that honey-toned timber or aged stone does. They read warm under natural and artificial light, complement almost any cabinet colour from cream to deep green to navy, and age gracefully — if the sealer wears in a particular area, the worn patch looks characterful rather than damaged.
Terracotta and copper tones: Less common but genuinely beautiful in a south-facing room where warm afternoon light brings out the copper undertones. Pairs particularly well with red brick walls, exposed stone, and warm timber.
Sage and moss greens: Produced by copper-based acid formulations. Subtler and cooler than the browns — appropriate for a farmhouse palette that leans more towards the Arts and Crafts aesthetic than the purely rustic. Works well with white or cream painted walls and exposed timber.
Light buff and sand tones: The lightest end of the acid stain range. Creates a floor that reads almost like worn limestone — pale, slightly warm, with subtle variation. The right choice where the room needs to feel light and airy rather than grounded and earthy.
Layered effects: One of the strongest techniques in farmhouse concrete staining is applying two or more acid stain colours sequentially, allowing them to interact and blend in unpredictable ways. A base coat of warm amber followed by a topcoat of coffee brown in a loosely overlapping pattern produces results that genuinely resemble aged, patinated stone. This is a technique that rewards experimentation — testing on a sample board or a hidden area first is essential.
Preparing the Concrete: The Step That Determines the Result
The quality of the finished stained floor is determined more by the preparation of the existing slab than by any other factor. Concrete that is clean, correctly profiled, and free of contaminants stains evenly and deeply. Concrete that has sealer residue, paint, grease, adhesive, or any other barrier on its surface will stain inconsistently — or not at all in the contaminated areas.
What the Slab Needs to Be
Bare concrete, fully clean: Any existing sealers, coatings, paints, or adhesive residues must be fully removed. Grinding (diamond cup wheel or floor grinder) is the most reliable method for complete removal of surface treatments. Chemical strippers can remove paint and coatings but often leave residues that affect stain uptake — mechanical removal is more reliable. The floor must be degreased — oil and grease from cooking, vehicles, or machinery block acid stain penetration entirely.
Correctly profiled: The surface should have some texture — open pores that the stain can penetrate. New concrete with a very smooth, over-trowelled finish may need light grinding or acid etching to open the surface. Old concrete that has been machine-polished or treated with a densifier may be too dense to stain well with acid.
Cracked and patched where necessary: Cracks repaired with cementitious repair mortars will stain differently from the surrounding concrete — typically lighter, since the repair material doesn’t have the same calcium hydroxide content that reacts with the acid. This can be worked with (the crack lines become design features if they’re addressed consistently) or worked around (staining with richer colours that minimise the contrast). Deep structural cracks should be repaired before staining; see our guide to fixing crumbling concrete floors for the repair process.
Aged at least 28 days if newly poured: Fresh concrete continues to cure chemically for weeks after pouring. Acid staining before the curing process is complete produces uneven, unpredictable results. Wait at least 28 days — longer is better.
The Application Process: Acid Stain Step by Step
What You Need
- Acid stain in chosen colour(s)
- Plastic or nylon sprayer (never metal — the acid will corrode it)
- Rubber gloves, safety glasses, and adequate ventilation or a respirator rated for acid vapour
- Baking soda and water for neutralisation (200g baking soda per 4 litres water)
- Stiff nylon scrubbing brush
- Wet/dry vacuum and mop
- Concrete sealer (see below)
The Process
1. Final clean: Sweep and vacuum thoroughly. Damp mop with clean water and allow to dry completely. The surface must be dust-free and absolutely dry before staining.
2. Protect adjacent surfaces: Tape off skirting boards, door frames, and any surfaces you don’t want stained. Acid stain will permanently stain anything porous — including your skin, clothing, and any adjacent timber or stone.
3. Apply the stain: Pour the stain into the plastic sprayer and apply in a loose, overlapping circular motion — not in straight lines or uniform strokes, which produce mechanical-looking patterns that betray the technique. Work in manageable sections. Don’t over-apply — a thin, even coat that wets the surface is better than a heavy pool.
For a layered effect, apply the lighter colour first and allow to react fully before applying the second colour. The interaction at the overlap areas produces the characteristic organic variation.
4. Allow to react: Leave the stain undisturbed for four to eight hours. Bubbling and fizzing is normal — that’s the chemical reaction happening. Don’t disturb it. The colour will appear different while wet than it will when dry and sealed.
5. Neutralise: Mix baking soda and water to the specified dilution. Apply to the entire stained surface, working it in with a nylon brush. This stops the chemical reaction. The floor will foam briefly as the baking soda neutralises the acid. Work systematically to ensure the entire surface is treated.
6. Rinse and dry: Mop up the neutralisation solution with clean water, rinsing multiple times until the rinse water runs clear. Wet/dry vacuum is ideal for removing water efficiently. Allow to dry completely — typically 24 hours in a ventilated space.
7. Seal: Apply the chosen sealer in two or more coats, following the manufacturer’s instructions. This is the step that fixes the colour, protects the surface, and determines the finished sheen level.
Sealer Choice: Matte, Satin, or Gloss
The sealer determines how the finished floor looks and behaves day-to-day.
Matte sealer: Produces a low-sheen, almost stone-like finish that suits farmhouse aesthetics most naturally. The colour looks slightly more muted than with higher-sheen options, but the floor reads as genuinely earthy and unpretentious. Matte sealers tend to show marks and footprints less than gloss. Appropriate for most farmhouse applications.
Satin sealer: A mid-level sheen that enhances colour depth without the obvious shine of a gloss finish. The most commonly recommended option for interior farmhouse floors — it brings out the richness of the brown and amber tones while keeping the look grounded.
Gloss sealer: High shine that reads as contemporary rather than rustic. Appropriate for commercial applications or for modern interpretations of the farmhouse style where a high-contrast glossy floor against matte painted walls is the deliberate design intent. Less typical in genuinely rustic farmhouse interiors.
For all sealer types, two or three thin coats produce a better, more durable result than one thick coat. Apply with a flat applicator or lambswool roller, working with the direction of the room rather than across it.
Water-based acrylic sealers are the most widely available and appropriate for most domestic applications — they’re non-yellowing, breathable, and reapplicable without stripping. Solvent-based epoxy or polyurethane sealers provide more durability in high-traffic commercial settings but are more demanding to apply and recoat.
The sealer is what wears out over time, not the stain itself. Acid-stained colour, once the reaction is complete and the slab is neutralised, is chemically bonded to the concrete and effectively permanent. Plan to reseal every two to four years in normal domestic use — more frequently in high-traffic areas like kitchens and hallways.
Living With Farmhouse Stained Concrete: The Honest Account
What It’s Like Underfoot
Concrete is hard. This is the most consistent feedback from homeowners who’ve never lived with it — the unforgiving surface underfoot in the kitchen after a long day is a real consideration. Adding underfloor heating addresses the cold problem but not the hardness. Farmhouse rugs — Persian-style, jute, or wool — in the kitchen eating area and in front of the range provide comfort where it’s most needed and look entirely appropriate on a stained concrete floor.
Maintenance
A sealed stained concrete floor in a domestic setting requires minimal maintenance: regular sweeping to remove grit, damp mopping with a pH-neutral cleaner, and prompt cleaning of spills. The same rules from the concrete floors cleaning guide apply — no acids, no bleach, no abrasives on the sealer.
The floor will develop a patina over years of use — slight wear in high-traffic paths, areas where the sealer has scuffed slightly, small marks that accumulate into something that looks like age. In a farmhouse floor, this is almost entirely an aesthetic advantage. The floor looks more genuinely lived-in at ten years than at one.
What It Looks Like in Different Lights
Lighting changes stained concrete colour considerably. Warm south or west light in the afternoon pulls amber and gold out of brown-stained floors. Artificial warm-white lighting in the evening produces a similar effect — the floor glows. Cool north light makes the same floor look more grey and reserved. This is worth knowing at the design stage: a floor sample viewed under a single light condition may look quite different in the actual room across a day’s worth of changing light.
DIY vs Professional Application
Acid staining is achievable as a DIY project for a careful, methodical person. The materials run under £0.50 per square foot — genuinely inexpensive. The risk is in the preparation and the neutralisation: inadequate surface preparation produces uneven stain uptake; inadequate neutralisation leaves residual acid in the concrete that continues to react and can eventually affect the sealer adhesion.
Test first — always. Apply the chosen stain to a small, hidden section of floor, allow to react, neutralise, dry, and seal. The test tells you how the specific concrete in your specific space will respond to that specific stain, which no manufacturer’s colour chart can tell you.
Professional application costs in the UK (2026):
- Basic single-colour acid stain with sealer, minimal prep: approximately £15–£35 per m²
- Multi-colour or layered effect with more complex prep: £35–£65 per m²
- High-specification decorative work with stencilling, sawcuts, or pattern work: £65–£120 per m²
These are noticeably lower than most comparable floor finishes. Stained concrete at £20–£35 per m² professionally applied is significantly cheaper than good quality porcelain tile, engineered hardwood, or natural stone at equivalent specification. This cost advantage, combined with the durability of acid stain — the colour is genuinely permanent — makes it one of the better-value flooring decisions available for a farmhouse interior.
Design Ideas: Room by Room
Farmhouse kitchen: Warm amber or coffee brown acid stain, matte or satin sealer, large Persian-style rug under the table. The floor reads as a continuation of the material honesty of the whole room — cream shaker cabinets, exposed brick, Belfast sink — without competing for attention.
Entrance hall: A slightly darker, richer stain than the kitchen — deeper coffee or tobacco brown — that hides tracked-in dirt while still reading as warm. A simple geometric border in a contrasting stain colour (lighter or darker) gives the hall its own identity. Easy to clean, genuinely hard-wearing.
Living room with wood stove: Sage or moss green acid stain in the area immediately around a cast-iron wood stove, transitioning to warm amber in the rest of the room. The green reads as the colour of old quarry tile — historically appropriate, visually interesting.
Utility room: The most practical case for stained concrete — acid stain with a gloss or satin epoxy sealer produces a surface that cleans up from anything, handles wet boots and muddy dogs without damage, and looks intentional rather than institutional. No rug, no apology.
The floors that work best in farmhouse interiors are the ones that feel as if they’ve always been there. Stained concrete, particularly acid-stained concrete in warm earthy tones, achieves this better than almost any other manufactured floor surface. The imperfection is the point. The variation is the character. The patina that develops over years of use is the payoff for choosing a material that ages gracefully rather than one that simply wears out.